

Today is 3D Tuesday at Paper Craft Planet and it's all about envelopes!

The Challenge: Make a project using an envelope. It could be any size you want to use... as long as you use an envelope
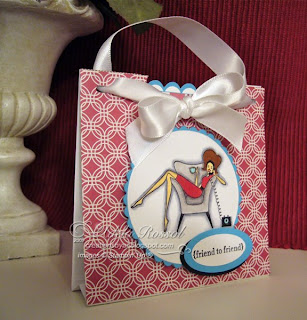
My sample project is a note and gift card holder using the SU! set Classy and Fabulous.
 SUPPLIES:
Legal Size Envelope
With slot punch, punch out at the four corners of envelope as shown.
 Align and mark pattern paper against the envelope and punch slots with punch.
Adhere both pieces of pattern paper to the envelope, aligning the holes.
Using the oval punch again, punch out area over the previous oval punch.
Slip ribbon through all four holes as shown.
Tie a bow using both ends of the ribbon making sure there is enough ribbon behind it to pull up for a handle.
 Tie a bow using both ends of the ribbon making sure there is enough ribbon left for the handle.
You can now decorate your envelope!
I used the stamp set from SU! called Classy and Fabulous! For inside the pockets, I made a gift card holder and card to match. Slide them into each pocket of the envelope tote.
 OK... now let's see what you can come up with. You don't have to use this type of envelope and pattern that I've provided, but just use an envelope in your project. Upload your project to PCP with the tag 3d21. and leave a comment on the 3D Tuesday group forum.
Take care and have a great day! Oh, by the way, if something doesn't make sense in this post, I kept dozing off and found myself typing what I was probably dreaming! I really need to start going to be earlier and some sleep!
 SUPPLIES:
Legal Size Envelope
1" White Satin Ribbon (about 20")
Slot Punch
Oval Punch
Two 4-1/8" sq. Pattern Paper (Thoroughly Modern)

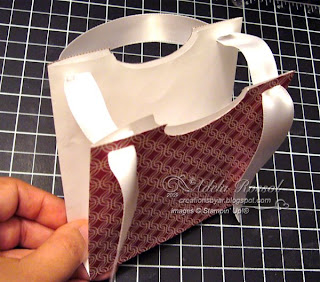
Seal envelope and fold in half cross-wise. Trim off both sides about 1/4" from edges.
Fold 1/2" from center fold on both sides ("M" shape)
With oval punch, punch out sides of envelope as shown.
Slot Punch
Oval Punch
Two 4-1/8" sq. Pattern Paper (Thoroughly Modern)

Seal envelope and fold in half cross-wise. Trim off both sides about 1/4" from edges.
Fold 1/2" from center fold on both sides ("M" shape)
With oval punch, punch out sides of envelope as shown.
With slot punch, punch out at the four corners of envelope as shown.
 Align and mark pattern paper against the envelope and punch slots with punch.
Adhere both pieces of pattern paper to the envelope, aligning the holes.
Using the oval punch again, punch out area over the previous oval punch.
Slip ribbon through all four holes as shown.
Tie a bow using both ends of the ribbon making sure there is enough ribbon behind it to pull up for a handle.
 Tie a bow using both ends of the ribbon making sure there is enough ribbon left for the handle.
You can now decorate your envelope!
I used the stamp set from SU! called Classy and Fabulous! For inside the pockets, I made a gift card holder and card to match. Slide them into each pocket of the envelope tote.
 OK... now let's see what you can come up with. You don't have to use this type of envelope and pattern that I've provided, but just use an envelope in your project. Upload your project to PCP with the tag 3d21. and leave a comment on the 3D Tuesday group forum.
Take care and have a great day! Oh, by the way, if something doesn't make sense in this post, I kept dozing off and found myself typing what I was probably dreaming! I really need to start going to be earlier and some sleep!

No comments:
Post a Comment