
 Elegant and country is what I ended up with when I made this week's 3D Tuesday Challenge for Paper Craft Planet. I just couldn't decided which way to go and what size to make, so I made both! The first one measures 4" across and 4-1/2" high and can hold 3" x 3" cards or gift tags. At first I attached the ribbon on the back so you can just tie it closed whenever you want, but then I decided to keep the ribbon tied by pushing the pin trinket through the layers of the ties. To open the folder, you simply slide off the ribbon... very simple.
 This next accordion folder I had made especially for a baby to go along with our Mother and Child Theme over at PCP. It's perfect for storing baby cards, mementos or photos. It's 7" across and 5" high and as an afterthought, I added a divider inside.
Here are the pieces and dimensions needed to make a basic accordion folder:
Score where indicated with the dotted lines. On the two smaller pieces, fold back and forth like a fan.

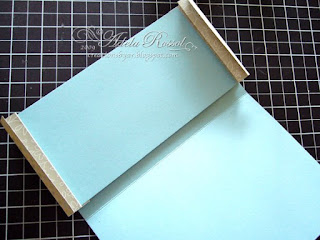
Glue the edge of one of the "fan folded" paper along one side of the solid cardstock, aligning the top and side edges -- bottom will be 1/2" shorter, that's ok.
Repeat with the opposite side.
At the last minute I decided to add a divider: cardstock 3-1/2" x 6-3/4". Glue one side of the divider to one of the "fan folds." Repeat on other side.
Finish gluing both sides until the folder is completed.

 Glue the 1-1/2" portion of the remaining piece of pattern paper to the back of the taller side of the folder.
Now comes the fun part ~ decorating!
Now it's your turn ~ I'd love to see what you come up with! If you're new, join our group HERE and play along!


No comments:
Post a Comment